About Granular synthesis
Clouds continuously records the incoming audio into a short amount of sample memory. While recording time can reach up to 8s by reducing the audio quality setting, you ought to feel very guilty every time you think of this as “tape” – think of it as a space, a room. Using this recorded audio data, the module synthesizes a sonic texture by playing back short (overlapping) segments of audio (also known as “grains”) extracted from it.
Clouds allows you to control:
- From which part of the buffer the grains are taken.
- How long the grains are.
- At which speed/pitch the grains are replayed.
- How much overlap there is between the grains (density).
- Whether the distribution of grains in time is constant or random.
- Which envelope curve is applied to the grains – giving the impression of a “rough” or “smooth” texture. In addition, to create textures with a “blurry” feel, a diffuser (network of all-pass filters – like a reverb without tail) can be applied.
The module plays grains continuously, at a rate determined by the DENSITY and SIZE settings. A trigger input is also present, to explicitly instruct the module to start the playback of a new grain. The maximum number of concurrent grains is quite large – between 40 and 60. This specificity brings Clouds closer to the roots of granular synthesis, and allows the synthesis of varied textures even from basic waveforms – there’s indeed many more dimensions to granular synthesis than keeping a playback pointer moving through a SD-card sample!
It is possible, at any time, to FREEZE the audio buffer from which the grains are taken – In this case, the incoming audio is no longer recorded. Somehow, Clouds is the exact opposite of a sampler: by default, the module always samples the audio it receives, except when it is in the frozen state.
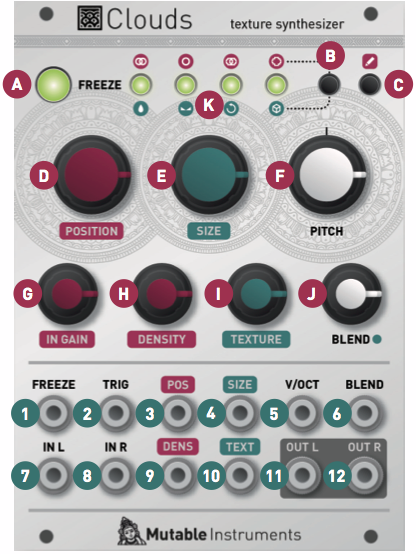
Front panel
Controls
A. FREEZE button. This latching button stops the recording of incoming audio. Granularization is now performed on the last few seconds of audio kept in memory in the module.
B. Blending parameter/Audio quality button. Selects which of the blending parameters is controlled by the BLEND knob and CV input, or selects one of the four audio quality settings.
C. Load/Save button. See the “Advanced topics” section.
D. Grain POSITION. Selects from which part of the recording buffer the audio grains are played. Turn the knob clockwise to travel back in time.
E. F. Grain SIZE and PITCH (transposition). At 12 o’clock, the buffer is played at its original frequency.
G. Audio INPUT GAIN, from -18dB to +6dB.
H. Grain DENSITY. At 12 o’clock, no grains are generated. Turn clockwise and grains will be sown randomly, counter-clockwise and they will be played at a constant rate. The further you turn, the higher the overlap between grains.
I. Grain TEXTURE. Morphs through various shapes of grain envelopes: square (boxcar), triangle, and then Hann window. Past 2 o’clock, activates a diffuser which smears transients.
J. BLEND knob. This multi-function knob is described in the Blending parameters section.
K. Indicator LEDs. They work as an input vu-meter. When FREEZE is active, they monitor the output level. Soft-clipping occurs when the last LED is on. They can also indicate the quality setting (red), the function assigned to the BLEND knob (green), or the value of the four blending parameters (multicolor).
Inputs and outputs
All CV inputs are calibrated for a range of +/- 5V. Voltages outside of this range are tolerated, but will be clamped.
1. FREEZE gate input. When the input gate signal is high, stops the recording of incoming audio, just as latching the FREEZE button would do.
2. TRIGGER input. Generates a single grain. By moving the grain DENSITY to 12 o’clock, and sending a trigger to this input, Clouds can be controlled like a micro-sample player. An LFO or clock divider (or even a pressure plate) can thus be used to sow grains at the rate of your choice.
3. 4. Grain POSITION and SIZE CV inputs.
5. Grain transposition (PITCH) CV input, with V/Oct response.
6. BLEND CV input. This CV input can control one of the following functions depending on the active blending parameter: dry/wet balance, grain stereo spread, feedback amount and reverb amount.
7. 8. Stereo audio input. When no patch cable is inserted in the right channel input, this input will receive the signal from the left channel.
9. 10. Grain DENSITY and TEXTURE CV inputs.
11. 12. Stereo audio output.
Blend parameters
The BLEND knob can control one of these four settings:
- Dry/wet balance.
- Stereo spread (amount of random panning/balance applied to the grains).
- Feedback amount.
- Reverberation amount.
To select which parameter is controlled by the BLEND knob and the BLEND CV input, press the Blend parameter/Audio quality button. The current parameter is temporarily indicated by a green LED.
When turning the BLEND knob, the color of the four status LEDs temporarily shows the value of the four blending parameters (from black when the parameter is set to its minimum value to green, yellow and then red for the maximum value).
It could happen that the position of the knob does not match the value of the parameter – the curse of multi-function knobs! If this is the case, turning the BLEND knob clockwise (resp. counterclockwise) causes a small increase (resp. decrease) in the value of the parameter, and turning it further causes larger changes, until the value progressively catches up with the knob’s position.
There are a few things worth knowing about these settings:
- All settings are automatically saved, and will be restored the next time the module is powered on.
- Strange things happen when FREEZE is enabled. Because feedback/layering can no longer occur in the recording buffer (hey, it’s frozen…), we route the output signal through delays and all-pass filters, and let the feedback build-up occur in this extra recording space – giving the sound a very reverb-like nature.
Advanced topics
Audio quality
Hold the Blend parameter/Audio quality button for one second, then press it repeatedly to choose a recording quality. The current quality setting is indicated by a red LED.
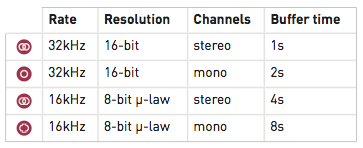
Note that Clouds’ 8-bit is a lovely flavour of 8-bit: µ-law companding. It sounds like a Cassette, or a Fairlight – less hiss, more distortion.
Saving and loading buffers
Up to 4 frozen audio buffers can be saved and reloaded. Along with the audio data itself, the quality settings and the processing mode are saved with it. To save the recording buffer in permanent memory:
- Hold the Load/Save button for one second.
- Press the Blend parameter/Audio quality button repeatedly to select one of the 4 memory slots. The selected slot is indicated by a blinking red LED.
- Press the Load/Save button to confirm.
To load a recording buffer from permanent memory:
- Press the Load/Save button.
- Press the Blend parameter/Audio quality button repeatedly to select one of the 4 memory slots. The selected slot is indicated by a blinking green LED.
- Press the Load/Save button to confirm.
If you press the Load/Save button by mistake, do not press any button for a few seconds and the module will return to its normal state.
Tips and tricks
- If you need a noise source to randomize grain position or pitch, you could do worse than reusing one of the audio outputs. It’s certainly not white noise, but it’s random enough…
- Scratch and caress a sound by using a contact microphone or a touch strip to trigger grains and modify playback POSITION.
- Very dense clouds sound the best when at least one parameter (pitch or position) receives random modulations. Otherwise, the many identical “echoes” created by the repeating grains will sound like a very resonant feedback comb filter.
- Raw material like sawtooth or sine waves sound very good, especially with heavy random modulation. A fun exercise is to recreate the classic THX sound with a random source and a VCA.
- Send a very fast sequence of 3 or 4 notes to the V/O input, so that each grain (if sown randomly) randomly picks one of those notes. The result? A chord!
- Experiment with capturing many small fragments of sound by sending short pulses to FREEZE while a complex patch is being played through the audio input!
A grain of sound is a brief acoustical event, with a duration near the treshold of human perception (usually between 10 and 60 milliseconds). The idea behind granular synthesis is the creation of complex soundscapes by combining thousands of grains of sound over time. In granular synthesis, a grain of sound is considered as a building block for the creation of more complex sonic events. An example of a grain of sound is shown in Figure 1.

|
The idea of having sound grains was proposed by the British physicist Dennis Gabor in 1947. Gabor suggested the idea of a quantum of sound, as a perceptual indivisible unit of information. All macro-level phenomena are based on the sound quantum.
Granular synthesis was first suggested as a computer music technique for producing complex sounds by Iannis Xenakis and Curtis Roads.
Granular synthesis is based on the production of a high density of small acoustic events called grains that are typically in the range of 10-60 ms.
To enable smooth transitions between grains, each grain has an amplitude envelope. In Gabor’s original conception, the amplitude envelope is a bell shaped curve generated by the Gaussian method:
 |
(1) |
Figure 2 shows different kinds of amplitude envelopes. Notice that, for computational purposes, simple envelopes such as triangular can be used.
When the envelope is applied to the grain, the effect shown in Figure 3 is produced.

|

|
2 Parameters of granular synthesis
The control parameters of a granular synthesizer are the following:
- Grain size: length of the grain in milliseconds (see Figure 4).
- Grain shape (see Figure 5). The grain itself may come from a sinewave, pulse wave, synthesis techniques such as FM synthesis or sampled sounds.
- Envelope shape (see Figure 2).
- Grain spacing over time (see Figure 6).
- Grain density: number of grains per unit of time (see Figure 7).
Typical grain densities range from several hundred to several thousand grains per second.

|

|

|

|
3 High-level grain organization
When organized over time, grains can be placed in a synchronous or asynchronous way.
4 Synchronous granular synthesis
In synchronous granular synthesis, grains are placed at equally spaced positions. This creates a periodicity which provides a sensation of frequency. For example, if grains are placed every 10 ms, a 100 Hz frequency will be heard.
A technique designed for the synthesis of tones with one or more resonances, i.e. this technique is suitable for imitating natural instruments and voices. All the grains are regularly placed over time.
5 Asynchronous granular synthesis
In asynchronous granular synthesis, grains are scattered randomly over a user-determined duration and with user-determined density and frequency content (depending on the waveform used in the grains).
6 Implementation
Granular synthesis can be implemented generating small sound events and placing them over time as if in a score. Lots of parameters are involved. Their choice and organisation is what makes granular synthesis more or less interesting.
6.1 Time stretching
In synchronous granular synthesis, it is possible to create time stretching effects by repeating the grains is a longer (or shorter) amount of time, without varying their distance.
6.2 Pitch shifting
In synchronous granular synthesis, it is possible to create pitch shifting effects by changing the space between the grains.
7 Applications
Granular synthesis has been extensively used in computer music for its high flexibility in manipulating sounds. Composers such as Xenakis, to cite just a few, has been using granular synthesis in their creative work.
Recently granular synthesis has also been used in computer games, to generate interactive soundscapes.
3.7 Granular synthesis
With regard to sampling (3.3) you learned how to change the speed of an existing sound in an array, but this also resulted in a change of pitch. One way to decouple these parameters, is by using granular synthesis. The idea of granular synthesis is that a sound is sampled at the original speed, but it is played at a different speed from each sample point.
You have an “indicator” that moves across the array at normal speed:
patches/3-7-1-1-granular-theory1.pd

Only at certain intervals do we get information about the indicator’s present position; when this information is received, the array is played back from that point, albeit at a different speed.
To understand this better, let’s say this is the normal playback speed:

…and this is a speed that is ‘too fast’:

…then granular synthesis does this:

Though playback is ‘too fast’ (or ‘too slow’), it always begins at a point that corresponds to the initial speed. These individual chunks are called “grains”; their size is referred to either as “grain size” or “window size”. These “grains” are so tiny and used in such large quantities, that they are not heard individually, but rather as a continuous whole. That’s the magic behind granular synthesis.
Every individual “grain” is played back like this:

After a grain is played, there is a jump to the next position; this position is taken from the current position of the “main indicator”. There is a special object to accomplish this: “samphold~”. It works like “spigot”, only on the signal level. Both the left and right inlets receive a signal. When there is descending step in the right inlet, “samphold~” immediately sends the sample currently in the left inlet and repeats this until the value in the right inlet is lower than the preceding one. This somewhat strange setting makes sense if the right input is a “phasor~”. It receives only once – right at the end of a period – a descending step. A grain could be read out this way and the offset could be added to the end of it:
patches/3-7-1-1-granular-theory2.pd

This way, the whole thing sounds higher, but with the same duration as the original. If you ‘look’ closely, it’s clear that this could lead to complications. If playback from one sample to the next is faster than the indicator’s speed (which runs at the original speed), then we’ll overshoot a sample and then return to it (thus repeating it) the next time “samphold~” is triggered. Conversely, if the “grains” are played back more slowly than the indicator moves, then some parts will be omitted. But as long as the original and the playback speeds do not diverge too dramatically, this is not (terribly) noticeable. To rectify this, some improvements can be made. First, you could use a Hanning window to suppress the clicks that result with every jump to a new value:
patches/3-7-1-1-granular-theory3.pd

The resultant gaps can be filled by using a second grain-reader, shifted by half a period:
patches/3-7-1-1-granular-theory4.pd

The nice thing about granular synthesis is that, in addition to the ability to change pitch without affecting speed, you can change speed without affecting pitch:
patches/3-7-1-1-granular-theory5.pd

For use in live performance, you’ll again need to use variable delays:
patches/3-7-2-1-granular-live.pd


Granular synthesis can also be used as a synthesizer for pitch clouds, most conveniently using a random generator:
patches/3-7-3-1-granularsynthesizer.pd