Library of Congress Pitch Shifting Tape Decks


The Library of Congress started building their own cassette machines in the late 60s. The type of machine you see showing up these days starting being built in 1976.

These are old fashioned rubber drive play only machines with 4 track heads in reverse track configuration. They have oscillator controlled vari speed via a slider on the front of the unit. There is also a spst insert for a remote switch 1/8″ or a breath switch (rare) and an 1/8″ input allowing you to use the unit as a mini amplifier. They are manufactured by Telex in the US and made to be rebuilt. Repair centers keep 20,000 of these things on the street via a vast network of workshops. There are approximately 600,000 of them nationwide.

In the right (wrong?) hands these things can have 101 uses:
– You can use them as grungy lofi amplifiers.
– You can use them to play regular two track stereo or mono cassettes backwards
– They can play at two different base speeds (15/16 or 1 7/8)
– You can manually adjust and pitch shift from the base speed to make a tape sound like Munchkins or Satan (or both on a good day…)
– etc. etc.
PLUS they run on bizarre nicad battery packs. Once charged you are completely mobile and can do all these horrible things and more in public, on stage, or anywhere you feel compelled to carry the thing.

NLS: That All May Read
Operating Our Cassette Player
Background

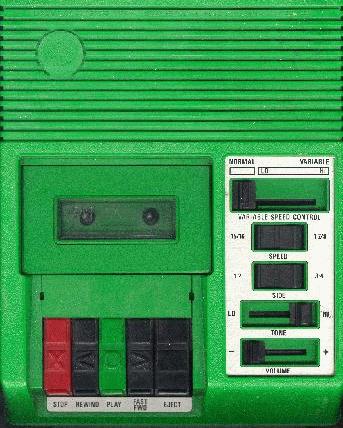
Our cassette player, known as a C-1, plays recordings at commercial speed and half commercial speed. NLS/BPH distributes its talking books on standard audio cassettes designed to play at half commercial speed and using four tracks. The NLS configuration can pack up to six hours of reading time onto one cassette. The C-1 side- and speed-selector switches enable readers to play cassettes created with the standard, commercial configuration as well as the NLS talking-book configuration. The C-1 player is shipped with a fully charged, rechargeable nickel-cadmium battery that will operate the player for about six hours after being fully charged. Simply plug the player into a standard household outlet to recharge it. Remember, you can always call your library about using the NLS/BPH player.
Using the Standard Cassette Player

You can operate the C-1 on its battery, or you can take the power cord from the recessed area in the back of the player and plug it into an electrical outlet. Here is a typical sequence for reading an NLS cassette talking book.

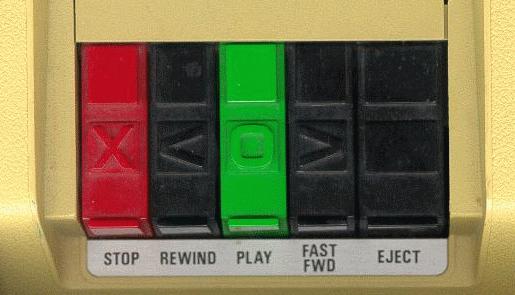
Open the tape compartment door by pressing the eject key, far right and marked with a raised square.
Insert the cassette, label side up, with the tape edge facing out. Seat the cassette by pushing it back until it clicks. Press the compartment door down until it clicks.
Press and lock down the play key (green with a raised circle) to start the player. Adjust the volume slide switch (nearest the front edge of the player).
Stop the player at any point by pressing the red key with a raised “x”, first on the left.
To review the cassette soundtrack, press rewind, the key between play and stop with the raised less-than sign, or arrow head pointing left.
To advance the cassette soundtrack, press fast forward, the key between play and eject with the raised greater-than sign, or arrow head pointing right.
To remove a cassette from the player, make sure it is stopped. Press the eject key, far right with a raised square. The tape compartment door will snap up, and the tape will pop free of its seated position. To play the next side, turn the tape over (print/braille label down), reinsert, seat in the door, and press the door shut. Then press the start key. After reading sides 1 and 2, rock the side selector switch to the right to listen to sides 3 and 4.


Tips
Switches and Buttons

Speed, volume, tone and side-selector switches are on the right of the player. Begin at the top of these controls, in the middle of the player as you face it, and you will find the following:
Variable Speed Control

Used to slow down or speed up the reading of the book. The voice of the narrator becomes distorted as the playback speed is changed.
Speed

A different sort of speed switch is just under the variable speed control. This is the speed switch that is used to match the speed of the player with the recording speed on the cassette. It is a rocker switch. Press, or rock it down, to the left (15/16) for our talking books. Press, or rock it down, to the right for commercial cassettes.
Side-Selector Switch

Another rocker switch, the side-selector switch enables readers to listen to both commercial and talking-book cassettes. Here are the things you should know about talking-book cassettes before you use the side-selector switch:

Talking-book cassettes will appear to be oddly numbered because of the four-side (or, four-track) system. The first side of the first cassette will be 1. The first side of the next cassette will be 5. Then, 9 and so on.
Turn the cassette over after each side.
When starting with side 1, push the side selector switch down to the left, marked 1-2. Do not change the switch to listen to side 2. Push the side-selector switch down to the right for sides 3 and 4. It is important to be methodical about the use of the side switch, or you may find yourself skipping whole segments of the book.
As guidance, the narrator will provide instructions at the end of each side.

Tone Control

This slider switch raises (to the right) or lowers (to the left) the pitch of the narrator’s voice.
Volume control

The volume control is also a slider. Louder to the right, softer to the left.
Battery Maintenance

To maintain battery life, the player should be played frequently unplugged, on battery. After several hours, up to six or until the battery fails, plug the player back into an electrical outlet to charge the battery. The player will operate, plugged in, while the battery recharges.

Do not remove the battery. As a nickel-cadmium product, it is toxic if not disposed of properly. If you suspect the player will not work because of battery problems, call the library serving you. They will arrange for a replacement player.


Obselete machines:

C 76 is Orange
C77 is White
C78 is Red
C79 is Green
C 80 is brown (they have a compression circuit but the unit sucks big time)

The 78 & 79 are by far the best units out there.

In addition there are similar plastic cased Record players:
A78 Red
A79 Green

Current machines require an appropriate license. If you find one of these you can exchange it at a local Library of Congress location for a discontinued (but equally good) model. Please do so.

C1 is Yellow
C 2 is Gray Direct drive transport
C 0 is Black ( for international users
E 1 (automated 1 control)

Record Players
A 80 Brown
A 1 Yellow

Combination machines:
CT 1 Yellow

In ’69, the first cassette machines were introduced and these played standard 2-track, 1 7/8 ips tapes. In ’73, the first 4-track machines were issued that would play at either 1 7/8 ips or 15/16 ips. Starting in the late ’70’s, most Library of Congress talking book tapes were recorded at 15/16 ips on four tracks. This enabled a standard C90 cassette to hold up to 6 hours of reading material. Tapes eventually phased out records, with the last magazines being recorded on 9″ flexible disc at 8 rpm in December, 2000. Now, digital cartridges and digital talking book players have phased out cassette tapes. Books were phased out first, followed by magazines. Somewhere, I have the last talking book magazine that I received on cassette and it’s from sometime in 2013. The library recently printed a note in it’s newsletter, telling us that they still had a small cassette book collection available to patrons who still had a cassette player in working order; however, cassette service will end when the machine fails to work because they are no longer being repaired or replaced.

It’s strange that on ebay, I’m all the time seeing talking book record players from the ’60’s until the ’90’s; but, as far as cassette players, about the only one I see is the C1 machine that was first introduced in 1981 and continued to be issued until cassette tapes were phased out. I rarely ever see any of the older tape players on ebay. I figure that part of the reason for that is because the tape players didn’t last as long as the record players and most of the older ones have probably already been turned in and replaced with newer machines. Personally, I’m on my 3rd C1 cassette player in a 14 year time period; however, many of the record players would last 20-30 years, if they were taken care of.


Eye grabbed mine off the shelf today for some tape experiments…
and was hit with total dread upon pushing transport buttons
nothing except a loud hum emitting from machine
these things are a sadistic joke on blind people trying to repair them
hidden 1/4″ hex head deep well screws hidden beneath the feet pads
was imagining some fucker laughing design this tape machine for the blind
luckily eye had my nut drivers handy
got back cover off and inside
revealing worn out stretched belt caught in main drive wheel
so……………………………………………………………………….
found the big bag o rubber bands for such occasions
took a couple attempts figuring out the belt path
first attempt did RW/FF yet was fuct on PLAY
on some further inspection the next attempt proved correct
abrahadabra!
playing better than ever
time for selecting some tapes
how about “Telepathic Communication With Animals”
or the demonstration tape for Portable Electro Shock Unit
and some tape recordings of Modular synths for further manual mutations
let’s take this baby for a spin through the Mixer with some FX!

Eye of course expect the value of mine instantly increasing by at least $100 upon completion of this post

Posted in Uncategorized | Comments Off on Library of Congress Pitch Shifting Tape Decks

Signal Noise/Hiss/Hum Suppresion Removal Methods

unwanted NOISE is far more than annoying
Eye turned on main rack yesterday and heard a fucking loud noise floor hum…
so began long process of troubleshooting WTF was happening
isolating gears in signal chain since entire rack is wired in Stereo Series for “Mastering”

could have just been lazy using “noise reduction” software  post yet that fucks with frequency spectrum

traced my problem yesterday down to Lexicon LX15
so used something had for years from doing “live sound” gigs
put on the incoming power running the entire rack
Image
works awesome plus comprehend now why/what/wtf ultimately needs being done with that rack
besides just temp slapping humX on it
so can put that Ebtech back in my goto bag of tricks :P

helps for troubleshooting that it’s not actually the Lexicon 15 power capacitors making the noise.

posting some info from pages researching on this subject recently

We’ve all experienced it—the errant hum, buzz or noise getting into our signal chain and making our lives difficult. There are no ‘magic wands’ to wave in every situation, so we’re going to look at several possible causes and solutions, as well as going over best practices to prevent noise in the studio. The practice of eliminating noise in the studio is an art in itself—we’ll cover the most common situations and, hopefully, give you the knowledge you need to understand how best to solve your particular issues.
Image
Do You Have The Power?

One of the most common causes of hum or other noise is improper grounding, including using ungrounded outlets for gear that requires a ground by way of a 3 prong to 2 prong ‘cheater’ adapter. Please do not use these—they are a potential hazard and, as they say, it’s always fun until someone gets and eye poked out or, in this case, electrocuted. If the wiring in your studio was installed before 1969, it’s likely that you only have these 2 prong, ungrounded outlets. There is only ONE safe way to use these outlets with grounded equipment—you need to hire an electrician to rewire the outlets with a ground. Yes, it’s expensive, but it’s worth every penny considering the alternative. Contrary to some claims, using a GFCI (Ground Fault Circuit Interrupter) or RCBO (Residual-current Circuit Breaker with Overcurrent protection) is NOT an alternative. These devices, if fitted into an outlet without a ground, still do not provide the necessary ground wire and, while they give some measure of protection, won’t solve any hum or buzzing problems you may experience.
Image

Along with ungrounded outlets, improperly grounded or mis-wired outlets are another major cause of noise. You can use an outlet tester to verify proper wiring and that a possible ground exists in your studio power outlets, however this does not test for a relatively common situation known as bootleg ground and it’s far more dangerous variation, RPBG (Reverse Polarity Bootlet Ground). A bootleg ground is when an older, 2 prong outlet has been converted to a 3 prong outlet, but without an actual ground wire—the ground is tied to neutral instead. An RPGB is that same situation, but where hot and neutral wires have been reversed, creating a extremely hazardous situation.
Image

In either bootleg ground situation, your typical outlet tester will show a properly wired outlet and so you need to test the outlets with both a ground impedance tester (aka Wiring Circuit Tester) and a non-contact voltage tester (NCVT). The ground impedance tester will indicate if you have a ground fault (newer models give you even more info about your wiring and its integrity) and the NCVT will indicate an RPBG situation. To test using the NCVT put the probe end of the unit into the ground circuit hold of the receptacle—it will indicate a ‘negative’ (typically a red light) in a situation where RPBG exists. Using the ground impedance/wiring circuit tester is usually as simple as plugging it into your outlet—its panel indicators will show any fault situations.
Image

Lastly, the difference in ground potential can be a major cause of hum and noise. The audio signal grounds between two pieces of gear are dependent on the AC outlets ground (and sometimes the gear itself can be a factor) and differences in the ground potential can cause the audio signal ground to ‘loop’ through to the other piece of gear and back again, causing the classic ‘hum’ you’ve all heard.
Image

When pieces of gear are connected to different circuits that have ground wires with differing impedances all signal grounds will go through the circuit with the lowest impedance. Common causes are ground wires that have different gauge wires in the circuit, bad ‘ties’ (where ground wires are tied together using wire caps and such) and so on. Again, a certified electrician should be called in to solve this type of situation.

In cases where you have the option, connecting all your gear to the same circuit can bypass any problems that would occur when connecting them to different circuits. This can be a quick and easy fix for ground loop noise and one that I recommend people start with when experiencing hum in the studio.

I realize this is a lot of info to digest, but proper studio electrical wiring is the best place to start to eliminate pesky noise and protect you from hazardous situations.
Go To Ground

Along with the ground potential in the electrical circuit situation above, you may come across situations where that audio gear or other factors are causing a difference in ground potential. If you know for certain that your power circuit ground is good, you’ll need to trace down which piece of gear is the likely suspect for the problem.

Unfortunately there is still plenty of gear out there that does not follow the proper practice of tying the ground wire in a balanced connection to chassis ground, rather than signal ground (aka ‘The Pin 1 Problem). You can typically consult the schematic of the piece of gear to determine if the ground/shield wire is connected to signal ground or chassis ground. If the gear ties it to signal ground, you may have to resort to using custom cables when connecting to that device that have the ground wire disconnected at one end of the cable. What this does is eliminates the connection loop between the pieces of gear. You also have the option, in some cases, of tying the ground wire of the interconnect cables to chassis ground via a screw on the case of the gear or to a specific chassis ground wire terminal on gear that supplies one. While more involved and time consuming, it can do wonders for eliminating hum and noise.
Image

Custom cables should be consider the least desirable option when trying to eliminate noise, but one that can be useful when necessary.

Audio ground lift boxes are another possible solution—and I stress ‘audio’ because we want to make a clear differentiation between audio ground lift and power ground lift. The latter should never, ever be used for the reasons discussed earlier in this article. Audio ground lifts essentially do the same thing as the custom cables mentioned above—they disconnect the audio ground wire at one end.
It’s All About Balance

Once you’ve conquered any problems with your power (properly wired and grounded circuits) the absolute best way to avoid noise and hum is to use balanced connections whenever and wherever possible. Balanced cables and connections are designed to eliminate noise and are your best friend in the studio. If your audio gear has balanced connections, it’s worth the extra cable expense to use them.

When your gear has only unbalanced connections such as RCA or TS (Tip-Sleeve) 1/4” connectors, it’s best to use isolation transformers between it and a balanced input. Using isolation transformers is another option instead of the custom cable assemblies mentioned above. In all cases pin 1 on the balanced end should be tied to chassis ground.

Direct boxes are another tool in the arsenal to eliminate noise—better ones even come with an isolation transformer and nearly all include an audio ground lift switch. You can use them between a high impedance, line level, unbalanced output to connect to a low-impedance, balanced input (think guitar or keyboard output to a mic input on your console or audio interface).
You Gotta Keep’em Separated

RFI (Radio Frequency Interference) and EMI (electromagnetic interference) are two other forms of noise induced in audio systems. RFI comes from everywhere—cordless and cell phones, wireless mics, radio transmitters, garage door openers and the list goes on. EMI noise sources are typically power supplies, monitors, computers, appliances and the like. These can be some of the most difficult to track down and eliminate but, by using these tips and techniques, your chances of experiencing them will go down significantly.

Keep your audio cables and power cables away from each other. If they have to cross, make the cross at a 90 degree angle. The further away you can separate them, the better.

Keep your audio cables away from power distribution boxes and power adapters, as both can be sources of EMI.

Put appliances on a different circuit than your audio gear. Have you ever had your refrigerators compressor turn on and hear a hum in your monitors? That’s EMI—the refrigerator is putting spurious noise in the power lines, which then leaks into your audio chain.

Turn off cordless phones or, if that’s not possible, keep them as far away as possible from audio gear.

Light dimmers in the studio—again, putting them on a separate circuit from your audio gear can help immensely.

Other RFI problems, such as hearing your local radio station in your audio system, are much more difficult to combat, your chances of experiencing this when following all the info in this article is lowered significantly.

When faced with EMI/RFI problems, it typically boils down to making sure you do not have power line noise sources on the same circuit as your audio gear and either eliminating or relocating devices and noise sources as far as possible away from your audio lines and hardware. Try moving things around and see if the noise goes away.
Bring Up Your Shields

One situation I see very often is people using low quality cables in their studios. These are not only more prone to noise induction, but also can degrade your signal quality. Several studios I’ve worked on over the years have completely eliminated noise and significantly improved their audio quality simply by upgrading their cables.
Image

Audio cables typically consists of an inner conductor(s), a dielectric material, a shield and an outer jacket. The difference between low- and high-quality cables comes down to the quality of each component.

Shield—There are 4 standard shield types (from lowest to highest quality): stranded, spiral, braided and foil. Stranded shielding is simply strands of wire run along the cable underneath the jacket. The problem with stranded shielding is that is does not give full coverage—any EMI/RFI noise sources can penetrate the shield and be induced directly into the inner conductor. Spiral shield is better, but flexing of the cable can cause gaps in the shield and, again, noise sources can penetrate through the gaps. Braided sheiding is typically the best in terms of coverage and flexibility, while foil provides the best in terms of coverage, but continual flexing of the cable can cause breaks or gaps in the foil, so it’s usually only used in situations where the cable is installed and never moved.

Dielectric—This is the material between the shield and the inner conductor(s) which acts as an electrical insulator between the shield and inner conductor(s), to prevent electrical conduction between the two. Typical dielectrics are made from PVC (polyvinyl chloride), PE (polyethylene) and PTFE (Polytetrafluoroethylene, aka Teflon). The ideal dielectric would completely isolate the shield from the conductor. The differences in the dielectric rarely come down to materials, but rather to their quality and consistency. Good quality dielectric materials will be the same thickness through the entire cable and be of high quality. Low quality dielectrics typically have defects, contaminants and other anomalies that cause variations in its electrical properties along the cable length.

Conductor—The debate rages on about silver vs. copper vs. oxygen-free vs. whatever material gimmick they come up with next to separate you from your hard earned cash. The reality is that, once you get to a certain point, the differences are minimal at best. Higher quality cables will use a thicker conductor (typically between 28 and 22 gauge) and some will use two twisted pair conductors for additional noise rejection.
Image

The shielding is likely the most important factor in cable choices—braided shielding is what you should aim for if you are going to be moving cables around, while a braid/foil combination is best for installed cabling.

One last factor that can play a part in elimination of noise is cleaning your cable and hardware connectors. Over time these can become corroded and oxidized, creating additional resistance and capacitance, which influence some of the situations discussed earlier. Use of a contact cleaner, like CAIG DeoxIT, will improve electrical conduction. Check out your cables—are the connectors bright and shiny or dull? If they’re dull—bust out the contact cleaner!

https://ask.audio/articles/how-to-elimi … the-studio

Noise‑reduction Tools & Techniques
Tips & Tricks

https://www.soundonsound.com/techniques … techniques

If hisses, clicks, thumps or hums wreck a great take, don’t panic: do something about it!

Posted in Uncategorized | Comments Off on Signal Noise/Hiss/Hum Suppresion Removal Methods

TEAC AX-10 Echo Delay Sound On Sound

Image
Eye should probably think about making Teac AX10 clone
The Model AX-10 Sound-On-Sound & Stereo Echo Unit is designed to adapt a stereo tape recorder so that it can make sound-on-sound recordings (mixing and recording from one track to the other) or apply echo effects during recording in stereo.
Either process is simply carried out by depressing the red buttons
singly or in proper combinations.
This unit is adaptable only to stereo tape recorders which feature the ability to record on one track while playing back the opposite track. In addition, decks with separate record and play heads and electronics are essential for the echo function.
Image
The AX 10 unit is nothing but a controlled loop around device that allows one to take a input and output (stereo) and apply the input signal to the recorder but also take a portion of the output when the red switches are down to apply back to the input for echo type control. This is mostly useful in a deck with three heads and when the deck is recording and monitoring off tape not source.
Then the delayed tape output of the machine gets mixed in with the input to make the echo effect. You can control the amount of insertion but not the delay amount. That is determined by the tape speed. The 15 IPS will be a shorter delay than the 7.5 IPS speed. These were made for decks like the A3340S type machines where recording with mics may have needed a echo added in.
The inputs go into the AX10, the cables go to the recorder L,R, then the output cables go to the recorder and the outputs to your mixer or amp come out of the jacks on the AX-10 box.
The unit adds an echo or sound on sound (less of an echo), to a recording by way of the difference in space between the record head and the play back head. Can be used only on 3 head machines. It sends what is being played back to the record head, which causes delay (echo), when it is recorded on the tape. The differrence in the space when between playback head and the record head causes the echo effect. If you you use the 3.75 speed the echo is increased. The Unit matches the impedence and adjusts the amount of echo.
Posted in Uncategorized | Comments Off on TEAC AX-10 Echo Delay Sound On Sound

Ensoniq ASR10 SCSI Drive Compatibility List

Ensoniq has also compiled a list –click here. Please remember – the drives listed here are the ones found to work or not work by individual users. It is only intended to show you the models we have found to be compatible. Our standards are

  • The drive must be able to be recognized by an Ensoniq unit.
  • The drive must be formattable (CD-ROM exempted, of course).
  • You must be able to load all sizes of files, large and small, and save all files, large and small.
  • The drive must be accessible by itself with no “helps”; however, we will list the drive as workable and list the “helps” required to make it work.

Fixed Hard Drives

General (most drives work)
Seagate
Connor
Western Digital
Fugitsu
Micropolis

Specific
Quantum LPS240
Quantum Fireball 1040mb
Quantum Lightning ProDrive 700mb
Seagate ST12400N 2.1 gig
Seagate 94171-350
Seagate 97560
IBM WDS-3160S
IBM DALS-3540

Removable Hard Drives

Syquest 44 – ALL, Yes for DiskTracks
Syquest 88/200 – functions initially with ALL, but not recommended for inconsistant reads and writes
Syquest 105 – ALL, Yes for DiskTracks
Syquest 270 – ALL, Yes for Disk Tracks
Syquest EZ-135 – ALL, Yes for DiskTracks
Note: We do find that the EZ-135’s are prone to malfunctions, and are not pleased with the general reliability
Iomega Zip Drive SCSI 100 or 250, external or internal – ASR, TS, 16-Plus, NOT FOR ORIGINAL EPS Yes for Disk Tracks
(Note on 16-Plus: you need an external powered termination device, such as the SCSI Sentry from APS, or another drive/computer hooked into the chain. Click here for more information)
Iomega Jaz Drive 16-Plus (see Zip notes), ASR, TS
Note:Older drives work; made before January 1997. Iomega then changed the firmware, and currently no recent Jaz works
Syquest SyJet 1.5gig Drive – ALL, Yes for DiskTracks
Note for ASR-X: Works properly on operating systems 2.55 and newer.
Syquest EZFlyer 230mb Drive – ALL, Yes for DiskTracks
Nomai 540mb Removable drive – ALL, Yes for DiskTracks
Nomai 750mb Removeable drive – ALL except ASR-X, Yes for DiskTracks
Castlewood Orb Drive – NO, does not work with ANY Ensoniq gear

CD-ROM Drives

It used to be that a good rule to follow was Sony, Toshiba, and Chinon mechanisms worked with Ensoniq products. That’s not exactly true anymore, so here are the following notes. They are based on the mechanism – the brand of the drive (such as Poweruser, etc) may be different. You can find out the mechanism brand by examining the listing on the external case, or by opening up the external case.

Notes:
-The Original EPS is not able to communicate with CD-ROM drives.
-The ASR-X is compatible with ALL the CD-ROM drives listed below, except NEC mechanisms
– ASR below refers to ASR-10/88.
– Remember that a higher speed (2x, 4x) does not make much difference after 4x.
– Matsushita nd Panasonic are the same company.

CD-ROM Drive Speed 16-Plus ASR TS-10/12 ASR-X/Pro Notes
All NEC CD-ROM drives N N N N Not compatible with any EPS/ASR sampler; not even the ASR-X
Mediavision Reno 2 N Y Y Y
Chinon 435 1 N Y Y Y Does NOT import Akai/Roland CD-ROM’s on ASR’s
Chinon 525 2 Y Y Y Y
Chinon 535 2 Y Y Y Y
Matsushita CR-503K 2 Y Y Y Y
Matsushita CR-503B 2 Y N N Y
Matsushita CR-504-L 4 Y Y Y Y
Toshiba XM-3201 1 Y Y Y Y
Toshiba XM-3301 2 Y Y Y Y
Toshiba XM-3401 2 Y Y Y Y
Toshiba XM-3501 4 N Y Y Y
Toshiba XM-5201 3 N Y Y Y
Toshiba XM5301 4 see notes Y Y Y 16-Plus: you need an external powered termination device, such as the SCSI Sentry from APS, or another drive/computer hooked into the chain.
Toshiba XM5401 4 see note Y Y Y
Toshiba XM-3701 6.7 Y Y Y Y
Toshiba XM-5701 12 Y Y Y Y
Pioneer DR-766 36 Y Y Y Y
Sony CDU76S 4 N Y Y Y
Sony CDU55S 2 Not firsthand tested, but not compatible with Ensoniq samplers
Sanyo CRD-254SH 4 Y
Apple CD150 (various models) 1 Y Y Y Y Can be erratic with different styles/brands of the drive. Use with caution.
Apple CD300 (various models 2 Y Y Y Y CD300 models use Sony or Matsushita mechanisms – both work.
Apple CD600 (various models) 4 Y see note see note Y CD600 models use Sony or Matsushita mechanisms. The Matsushita models are NOT compatible with the ASR-10/88 or TS series, but do work with the 16-Plus and ASR-X.

CD-ROM Speed Tests

These tests were done with identical files on a pressed CD-ROM (not CD-R). The files were at different physical locations on the drive, from the inner to the outer cylinders. Nevertheless, all the drives are measured identically. The mechanisms we use for our line of Chicken CD-ROM Drives are noted.

Type (in seconds) 381 blocks 1989 blocks 5184 blocks 11595 blocks Akai Import
Deluxe Toshiba XM-3201B 3 10 26 56 144
Chinon 525S 1.5 4 10 23 129
Sony CDU541 2 8 19 43 136
Toshiba XM-3301 2 7 17 41 134
Standard Toshiba XM-3401B 1.5 5 13 27 132
Sony CDU-76S 1.5 4 9 19 122
Toshiba XM-4101 1.5 5 14 30 135
Matsushita CR503-B
Premium Matsushita CR504-L 9
Toshiba XM-5301/5401 1.5 4 11 21 127
Toshiba XM-5701 1.25 4 10 22 129
Posted in Uncategorized | Comments Off on Ensoniq ASR10 SCSI Drive Compatibility List

SynthWizards Vomitron NoiseWall

4 noise source generators
separate Volume/Panning
Static Injector for creating noise from waveforms
SVF Multimode Filter
CV noise injected into Filter Frequency
also external input F/C to SVF Freq
midi automated parameters
VST for generating extreme noise walls
or use it for complex noise source generator
instant HNW albums
went with original concept name
“VOMITRON”

http://www.n01ze.com/synthwizards/ARKIV … ZEWALL.rar

Posted in Uncategorized | Comments Off on SynthWizards Vomitron NoiseWall

16000 BBC sound effects

http://bbcsfx.acropolis.org.uk/

bloody fucking awesome!
would be even better if in one file for download….
yet that’s alright
saves from having to record/edit/catalog them from vinyl
like we used to do….
collect those old BBC soundFX records….
would always search for them in broadcast studio source libraries
hipster used record shops
& even thrift stores
fuck….
looks like need going through that list of 16k bbc sounds starting today

Posted in Uncategorized | Comments Off on 16000 BBC sound effects

Musique Concrete Techiques


I. Musique Concrete and the emergence of electronic music
Musique Concrete is nothing new. It was pioneered by Pierre Schaeffer and his team in the early 1940’s at the Studio d’Essai de la Radiodiffusion Nationale, an experimental studio created initially to serve as a resistance hub for radio broadcasters in occupied France, in Paris. While Musique Concrete might not be anything new today, at the time however, it represented a major departure from the traditional musical paradigms. By relying entirely on recorded sounds (hence the name “concrete”, as in ‘real’) as a means of musical creation, Schaeffer opened the door to an entirely new way of not only making, but also thinking music. It represented a major push towards a number of new directions.

Timbre was all of a sudden an equally important musical dimension as pitch had been up until then, something that composers like Edgard Varese had long been thinking and writing about. It also paved the way for the emergence of new compositional forms and strucutures. As Pierre Boulez pointed out in “Penser la musique aujourd’hui”, musical structures were traditionally perceived by the listener as a product of the melody. By removing the melody altogether, and working instead with sound objects, Schaeffer became a bit of an iconoclast. As he himself pointed out in his “Traité des objects musicaux”, the composer is never really free. The choice of his or her notes is based upon the musical code that he himself and his audience have in common. When Musique Concrete was invented, the composer had moved one step ahead of his audience, and was, to some extent, liberated.

One of the earliest pieces of the genre, and perhaps the most famous to this day is Schaeffer’s own “étude aux chemins de fer”, where the composer mixed a number of sounds recorded from railroads such as engines, whistles and others, in order to create a unique, and truly original composition.

You can listen to the piece here: http://www.synthtopia.com/content/2009/11/28/pierre-schaeffer-etude-au x-chemins-de-fer/

By today’s standards, the techniques used by the pioneer of the genre were rudimentary at best, yet they were, and remain, crucial tools of electronic music creation to this day. By taking a look at these techniques, and applying them to a computer music language such as Csound, we can not only gain a better understanding of this pivotal moment in music history, but also deepen our knowledge of sound and composition.

II. Concrete Techniques

The early composers of Musique Concrete mostly worked with records, tape decks, tone generators, mixers, reverbs and delays. Compared to the tools available to the computer musician today, it’s a rather limited palette indeed. This however forced the composer to be much more careful in the selection of the source materials, mostly recordings of course, and far more judicious with the use of the processes to be applied. Using recordings as the main source of sounds confronts the composers with decisions early on in the compositional process, which will have profound consequences on the final piece.

1. Material Selection

While perhaps a bit reductive, the compositional process could be thought of as the selection and combination of various materials. When working with sound objects, the selection process is maybe even more crucial.

It could easily be argued that this process begins at the recording stage. If you happen to be recording your own material, the auditory perspective you chose will have a profound impact on the outcome of the sound. As Jean-Claude Risset pointed out in the analysis of his 1985 piece “Sud”, the placement and choice of the microphone will hugely change the sound itself. For instance, placing the microphone very close to the source will have a magnifying effect on the sound, while moving it back a bit will give a broader view of the context within the sound is recorded, allowing more ambient sounds and atmospheres to seep in. This is something audio engineers have been very aware of for a long time, but that often gets overlooked by computer musicians. I’m quite fond of small microphones, such as Lavalier mics for instance, which allow the engineer to place them in places where a traditional microphone will not fit, very close to the sound source. This makes for some very interesting results. For instance, a lav mic placed right below a rotating fan will make it sound like a giant machine, shaking and rattling as if it were 60 feet tall inside a giant wind tunnel. As always, experimentation and careful listening is key.

If you are working with already recorded material, an interesting approach is to work with different sounds, but that evoke similar emotions. This approach was favored by the American composer Tod Dockstader, who in his 1963 piece “Apocalypse” used a recording of Gregorian chant as a vocalization to the slowed down sound of a creaky door opening and closing. Dockstader came from a post-production background, and perhaps it is no accident that Schaeffer had a background in broadcasting and engineering as well.

You can listen to an excerpt of Apocalypse here: http://www.youtube.com/watch?v=TYabnQctxpo

This technique, of using very different sounds that evoke similar or complementary emotions, is also often used by film sound designers.

Star Wars’ sound designer Ben Burtt often speaks of this in his process. By working with familiar sounds, combining them in unexpected ways and putting them to picture, he has been able to create some of the most successful and iconic sounds in the history of film.

2. Sound techniques and manipulations

While the technology available to the pioneers of musique concrete was fairly primitive, composers managed to come up with a number of creative methods for sound manipulation and creation. A non exhaustive but comprehensive list of these would include:

– Vari-speed: changing the speed of the tape to change the pitch of the sound.

– Reversal: playing the tape backwards

– Comb Filtering: by playing a sound against a slightly delayed version of itself various resonant frequencies are brought in or out.

– Tape loops: in order to create loops, and grooves out of otherwise non rhythmic material, composers would repeat certain portions of a recording.

– Splicing: to change the order of the material, or insert new sounds within a recording

– Filtering: to bring in or out different frequencies of a sound and change its quality and texture

– Layering: Either done by recording multiple sources down to a new reel or by mixing them in real time via a mixing board.

– Reverberation, delay: used to create a sense of unity, or fusion between sound sources coming from different origins, and a great way of superimposing a new sense of space on an existing recording.

– Expanded-compressed time: by slowing down, or speeding up then reversing the direction of a sound.

– Panning: allowing the composer to place the sound within a stereo or multichannel environment

– Analog Synthesis: Although the genre was based on recorded sounds mostly, composers sometimes inserted tones and sweeps from oscillators in their compositions.

– Amplitude modulation: Often done by periodically varying the amplitude of a sound or applying a different amplitude envelope over it.

– Frequency Modulation: Although frequency modulation as a synthesis technique was discovered long after the beginnings of tape music, vibrato was a well-known technique long before then.

Sampler Concrete

Many tape techniques are simplistic in nature and are easily mimic-able in the digital domain. After all, a sampler can be thought of as a high-tech featured-endowed tape machine. A more apt comparison would be that of a waveform editor such as Peak, WaveLab or Audacity.

Csound instrument called “splice” that is about as basic as it gets when it comes to samplers.

https://gist.github.com/jacobjoaquin/1270309

Let’s take a look at the score interface to “splice”:

i “splice” start_time duration amplitude begin_splice end_splice

The start time and duration are both default parameters of a score instrument event. Three additional parameters are included for setting the amplitude, specifying the beginning time (in seconds) of the sample and specifying the end time (in seconds) of the sample to be played.

With this short list of instrument parameters, the following techniques are showcased in the Csound example: Splicing, Vari-speed, Reversal, “Tape” Loop, Layering, Delay and Comb Filtering.

Continuing Schaeffer’s tradition of using recordings of train, I’m using a found sound that I found on SoundCloud of the Manhattan subway. The recording is approximately 30 seconds in length. Most of the splicing in the examples take place between 17 and 26 seconds into the recording. Here are the results.

With this one simple instrument, it is entirely conceivable to compose a complete piece in the style of classic tape music.

http://codehop.com/sampler-concrete/

eye have created several tools specifically for composing concrete musique as main function then realized they could perform way more functions so evolved them over time….


Posted in Uncategorized | Comments Off on Musique Concrete Techiques

Panzer SVF Filter Tank

Eye designed this Dual multimode SVF (State Variable Filter) VST recently
whilst doing some experiments & subsequent virtual tests
preparing for building same basic thing in hardware
with 2xSteiner Parker Synthacon SVF filters
using this creation on most everything now
because it turned out Awesome for my purposes
especially with samples, synths, noise, & percussive beats tracks
made input do the ms20 ESP trick
for injecting CV from f/c audio input into the Filters frequency
also introduced “circuit ground bleed” with resonance cranked
plus added some gain distortion on all the filter outputs
kicks increasing when FM(Frequency Modulation) is at 8 and above
Obviously it’s based on the “Sherman Filter Bank” manuals
thus why it’s named “Panzer Filter Tank”
Stereo or Mono operation as insert
LFO is BPM sync with host from 32b to 1/32
now the final Mark IV non prototype version
sounds/responds like analog VCF circuit
with “optional” wild overdriven self oscillations
Extreme Noise Maker
works wunderbar for me smile

Posted in Uncategorized | Comments Off on Panzer SVF Filter Tank

Don Solaris ASR-10 synthesizing industrial sounds

fact

I love ASR-10! Here’s a Roland TR-909 cymbal turned into a factory drone. I will provide a step by step guide here on how to create one. To get this atmosphere i used a standard TR-909 ride cymbal. First task was to loop it from around 30% until 80% (loop end). One thing i like about ASR-10 is that it features several crossfade methods for making loops smooth. Those are:

  • Crossfade Loop
  • Reverse Crossfade
  • Ensemble Crossfade
  • Bowtie Crossfade Loop
  • Bidirectional X-fade
  • Make Loop Longer
  • Synthesized Loop

For this particular purpose i used Synthesized loop since it adds its own flavor, depending on what Smoothness method you use. It almost completely removed the volume differences. After that point i copied the loop addresses and set these values to sample start and end address. After that i used Truncate Wavesample to keep just the looped part. Then i normalized sample.

To add even more flavor and bring up some harmonics from the background i then applied a function called Volume Smoothing which is a sort of a dynamics compressor that further removes dynamic changes making the sound more constant. This function has Smoothness option as well and i’ve used Fine setting. It took a while for ASR-10 to do the processing.

Now it was time to expand the sound into stereo field. I loaded the last 44.1k effect that comes on OS V3.53 floppy disk which is called “Parallel EFX” and used a preset in it called “Smaller Spaces”. It adds some industrial flavor as well.

Now it was time to resample it with this effect. I pressed the same note across three octaves (D1, D2, D3) and sampled about 5 seconds of it. Trimmed it to remove the 0.5 sec of beginning and about 1 sec of ending (to remove empty space at the end). Then i’ve normalized it. I’ve set loop mode to forward and that was it. No need to crossfade loop this time since there are a lot of harmonics and no click will be heard.

After that i’ve loaded “ROM-02 44KHZ Reverb” and used its preset called “Long Reverb”. Only thing left to do was to go to filter, set it to “3pole LP / 1pole LP” and manually open it.

http://www.donsolaris.com/?p=184

Posted in Uncategorized | Comments Off on Don Solaris ASR-10 synthesizing industrial sounds

Don Solaris Why using old hardware samplers?

imgext

Here is a common question that pops up from time to time on various music production forums:

“I am really curious…WHY would anybody want a dedicated hardware sampler in this age of high performance computers?”

Here is what i have to say on the subject:

  1. Sound (very important)
    I have a NI Kontakt which is de-facto standard in computer sample playback. While i use it on daily basis as a working tool to develop a sample library i find it zero to non interesting for sonic manipulation. So, if i need tool to play a 1GB piano sample, i will obviously use a Kontakt, because it’s there within a few mouse clicks, not to mention the library explorer, etc, thousands of sounds at your finger tips. Plus the all powerful scripting tool. But if i want a specific sonic character, i go straight for the ASR-10 or Emax I or S-550, etc without any second thought.
  2. Authenticity (sometimes crucial)
    If i want authentic sound of the 90s, yes i can import an Akai sample CD into Kontakt, but that doesn’t mean it will sound the way it was designed to sound, when played from original machine (ie S1100), with original parameters, and all its quirks.
  3. User interface & mind focus (i find it important others might not)
    Yes i have a few samplers for which it can be said they sound the same as a Kontakt would if sample is not transposed too far away, a non resonant filter is used etc. For example Akai S3000XL. However the problem is i just can’t stare at the screen for 10 hours. Sorry. Second thing, and more important, not only it is tiresome after a few hours but the mind during that time occupies *totally different area* of the brain, which in this case is visual cortex, instead of finding myself in the creative portion of the brain and going for the SOUND. While its 32MB might not be spectacular, it is more than adequate to run a complete drum set and run some loops thru resonant filter, etc. During all that time i want to focus on the keyboard, a mixing desk and effects processors rack, NOT on a computer monitor. It is a night day difference after a few hours of working – and those who work this way know what i talk about. In fact, take a look at second hand sampler prices. Emax I was $100 just a few years ago. Try to find SE/HD rack version nowadays below $1000 if you can. We talk about a machine with 512kB of RAM.
  4. Fetish factor (probably irrelevant but…)
    Yeah there’s something cool about navigating thru Akai’s screens or moving that second rotary dial on S1100 to setup various things. The one that goes “click” each time you move it a single tick.
  5. Misconception (many people don’t know)
    While in the 90s it might be pain in the a** to setup something like a 76 keys drumset on Akai S1100, today with modern computer this takes several seconds using a software called Translator. In fact it takes the same amount of time to build a drumset on Akai as it does on a Kontakt. Just drag and drop a folder of samples and they are automatically mapped across any amount of octaves you set. Only requirement is that your computer has a CF card slot and that Akai is connected to CF drive or has a CF drive (such as Raizin Monster). Gone are the days of navigating thru menus and setting each sample with its dozen parameters.

There’s probably more but this is what i decided to say on the first call. Particularly since the question became so ubiquitous. So i hope this solves the enigma – once and for all!

Posted in Uncategorized | Comments Off on Don Solaris Why using old hardware samplers?